
Before I begin today's topic, I'd like to say sorry for forgetting to create a linky on yesterday's post... Please go back to yesterday's post and link up your tutorials, patterns or books that you have loved!
:)
Today's topic is

Make the cut : Cutting basics - Rotary and with scissors

Did you realize that after 2 full weeks of pondering over things, we actually begin making the quilt today!
So what first - Cutting, of course!
Tools
1. A Cutting Mat


:)
Today's topic is

Make the cut : Cutting basics - Rotary and with scissors
Did you realize that after 2 full weeks of pondering over things, we actually begin making the quilt today!
So what first - Cutting, of course!
Tools
1. A Cutting Mat
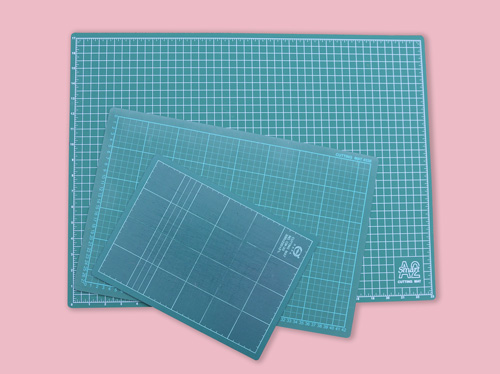
Made from self healing vinyl or rubber. They not just protect the surface you are working on, but also increase the life of that blade! They are available in a variety of sizes and usually have a grid on one or both sides.
I used a 24" x 36" mat on my table for cutting fabric and another 12" x 18" to trim my blocks when I had different sewing and cutting tables... But now that my sewing machine sits right on the side of my mat I dont need to have two mats!
Depending on the size of your workspace, I would recommend using at least a 18" x 24" mat...
2. Rotary Cutter

These are available in various sizes and two designs. The blade diameter (18mm, 45mm and 60mm) defines how many layers can it cut through. The 60 mm blade can cut through a larger number of layers, but the 18mm blade will be easy to maneuver around tricky shapes!
I use the ergonomic 45 mm cutter for most of my work.
Keep your rotary cutter blade retreated at all times when its not actually cutting fabric.
You do not want to suffer and injury and postpone making that quilt, do you?
3. Quilting Ruler
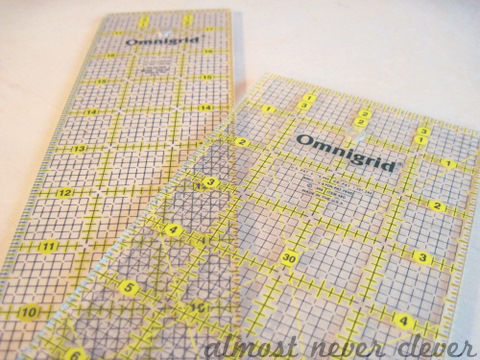
With grid markings on it, the quilting ruler is an essential tool for accurate fabric cutting... Available in too many sizes, I feel that you basically will require a longer one (preferably the 6" x 24") for cutting largers fabric pieces and a smaller square one (say 9.5" x 9.5") for block trimming!
I have a set of 4.5" sq, 6.5" sq, 9.5" sq, 12.5" sq and 6" x 24", but I have used the 6 x 24 more than anything... On a typical day, you will always find that one on my cutting mat and not in its holder!
Now that you have gathered your tools, you'll need some fabric... Aha! Divine!
Iron your fabric with a steam iron. Dont fret about not having a steam iron... Go ahead use your regular iron, just spray some water before you use the iron...
Understanding Grain
First you will need to check the grain of the fabric... Just like wood, even fabric has grain... And the alignment of the grain can have an effect on the appearance of the finished product!

The lengthwise grain has warp threads. Pieces of fabric cut along this grain have most strength and stability.
The crosswise grain has weft threads...This grain can sometimes have a little stretch to it and is stable, though not as much as the lengthwise grain.
Both the lengthwise and crosswise grains are referred to as straight grains.
The bias grain is at a 45 deg angle to the lengthwise and crosswise grain (it is the diagonal of the fabric). This is the least stable of all. A piece of fabric cut along thins grain, will stretch. That is the reason we use bias strips to bind along curves.
Truing up Fabric
You need a straight edge (parallel to the straight grain also) to your fabric for reference when you cut. Making this straight edge is called truing up of fabric.
First fold the fabric along the length laying the selvedges on top of one another.

Place the ruler (the 6" x 24" one, I would recommend) along the edge and open and glide your rotary cutter in a swift (not fast) movement along the edge of the ruler to make a cut.

Now this edge will be the reference for further cutting your fabric.
Cutting Strips

Align the true edge of your fabric with the corresponding marking on your ruler to cut strips of fabric. Always keep the fabric that you will be using under the ruler.
If the width that you need to cut is more than the width of your ruler, use another ruler (The square one that you have will do) as an extension or you can use the grid on the mat as a guideline.
If you need to trim the strips, just rotate them and align them with the markings on the mat and cut at desired length!
Cutting Bias Strips
Your quilting ruler usually comes with markings for 45 deg for cutting bias strips.

Keep your fabric aligned with the grid on the cutting mat. Use the markings on the ruler to align the true edge of the fabric with the 45 deg marking and cut. This edge will now be your reference to cut further strips.
Cutting with Scissors
If you do not have a rotary cutting set, do not worry. You still can make all those fabulous quilts... I did that for the first almost 6 months!
Invest in a good quality fabric shears. It will pay off, trust me.

First mark your fabric with a ruler. Be sure that you have aligned the edge of the ruler to the grain of the fabric.

Cut along the exact lines using your fabric shears. Cut only one layer at a time for best results.
It is time consuming and it hurts your fingers, but do not be tempted to cut multiple layers.
If you find using a regular pair if shears too daunting, you can invest in one of these spring assisted scissors. They will not hurt your hand like the regular ones!

So now that you know all about planning a quilt and cutting fabric, go ahead, cut it all up and keep it ready for making that quilt...
Tomorrow, Bernina will tell you all about sewing machines!!!
Cheers!!!

oh my god...i dont know how i missed out such a beautiful and informative blog till now, ah better late than never...
ReplyDeletei ll be a regular visitor...
keep going...good work.