
Hey guys, today we have a visual treat for you!


Once you have your foot set up and the machine ready to go, what next?


To Please your Eyes : FMQ Design Options
And to bring to you thins post, we have a very special guest. She has tried it all! I can say that. Leah Day is the lady behind The Free Motion Quilting Project. I have not seen anyone else quilting so many FMQ designs!
So here we have today, Leah Day!


Now it’s time to discuss FMQ
designs, or free motion quilting designs!
This is always my favorite part because you can and a whole new level of
design over the surface of the quilt with your quilting stitches.
Let’s start by understanding
a bit about free motion quilting and how it works:
Free motion quilting gets its
name from the fact that you move your quilt freely over the surface of your
machine. You need to be able to move the
quilt in all directions easily which means you will need a special foot for
your machine called a darning foot (some shops also call it a free
motion quilting foot).
To ensure a totally free
range of movement, many quilters will also lower the feed dogs of their
machine. Feed dogs are the little teeth
that feed fabric forward, and obviously we want the quilt moving more than just
forward, we want it to move in all directions!
Personally I find that the
feed dogs are essential for maintaining proper thread tension on my machines,
so instead of dropping the feed dogs, I lower my stitch length to 0 so the feed
dogs move, but they no longer feed the fabric forward.
I also cover my feed dogs
with a tool that makes free motion quilting much easier - a supreme
slider. This Teflon sheet goes over the
surface of your machine bed and reduced the friction between your quilt and the
table, making it much easier to move and shift in free motion!
When you’re just getting
started make sure to pay attention to your darning foot. When you lower this foot, make sure that it
is not squishing your quilt. The foot
should just hover over the surface of your quilt and you should be able to move
the quilt smoothly and evenly at all times.
It really can’t be stressed
enough the importance of your quilt being able to move smoothly and evenly
under your darning foot. If you find
this is impossible, check out instructions on how to modify your foot right
here:
Once you have your foot set up and the machine ready to go, what next?
Now it’s time to play with
fun designs! Because you can move your
quilt in all different directions, you can now quilt an infinite number of
designs: leaves, vines, feathers, flowers, hearts, squares, triangles - any
shape or design you can think of.
Let’s get started learning a
simple free motion quilting design called Venn Diagram.

To quilt this design, first
stitch a circle. Now stitch another
circle, overlapping the first.
Experiment with stitching your circles in many different sizes and
directions so they fill your quilt randomly.
Then try quilting the circles
all the same size and in a line. See
which way you like better as you stitch this design over your whole quilt.
You can learn a bit more
about Venn Diagram right here:
http://freemotionquilting.blogspot.com/2010/08/day-209-ven-diagram.html
http://freemotionquilting.blogspot.com/2010/08/day-209-ven-diagram.html
If you’d like more practice
before stitching this design on your quilt, try drawing it. Many quilters have found that if they can
draw a design, they can usually quilt it.
Now let’s try another simple
design called Basic Spiral.

To quilt this design, first
stitch a large spiral, leaving yourself space to get back out again. Swirl around your quilting space into another
spiral, interlocking it with the first.
Watch a video on how to quilt
Basic Spiral at:
http://freemotionquilting.blogspot.com/2009/08/day-5-basic-spiral.html
Basic Spiral does require a
bit of practice to get the hang of. When
I first got started free motion quilting, I would never remember to leave space
to get back out of a spiral, and end up getting stuck.
Fortunately I soon figured
out that you can just loop out of the center of the spiral to create Spiral
Knots:

To quilt this design, start
the same way as with Basic Spiral, only this time don’t leave space for you to
get back out of the spiral. Instead get
into the center, then stitch over the entire spiral design to get out of that
space and start a new shape.
It’s a bit trick to explain,
so click here to read more about this design and watch a video:
http://freemotionquilting.blogspot.com/2011/12/day-348-spiral-knots.html
You might have noticed that
each of these designs can be quilted without stopping. Free motion designs are typically called
continuous line designs because they can be stitched without breaking thread in
one long, continuous line.
However, sometimes you’ll
need to get from one area of your quilt to another, or from one area of a
design to another (such as around a new area of a circle in Venn Diagram), and
the only option appears to be to break thread.
But there is another option: travel
stitching.
Travel stitching means to stitch
over a previous line of stitching. If
you stitch RIGHT ON TOP of the stitched line, you can easily get to a new area
of a design without breaking thread.
See what I mean by stitching
Modern Art:
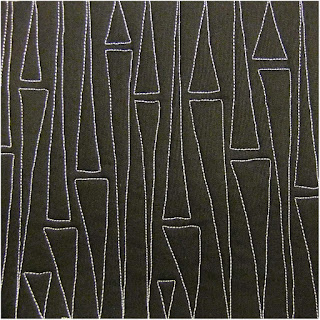

To quilt this design, start
on the edge of your quilt sashing and stitch a long skinny triangle shape into
the center of the sashing area. Now
travel stitch in the pieced ditch area of the quilt and branch out with a new
triangle shape. Continue working down
one whole side of your quilt until the entire sashing is filled with triangle
shapes like this:


Now travel stitch to the
opposite side and branch out with new triangles, matching them up and
interlocking them with the first side.
Because the sashing was first
stitched in the ditch, there are two layers of thread along the edges of this
quilt sashing. It will appear darker on both sides of the quilt because of the
2 layers of thread in these areas, but so long as you stay on the line, you’ll
be able to quilt this design through your entire sashing area without breaking
thread!


Learn more about Modern Art
right here:
http://freemotionquilting.blogspot.com/2009/12/day-110-modern-art.html
Another important technique
to learn for free motion quilting is echoing.
This is the ability to stitch a line, then stitch another line a
specific distance away.
The best way to learn echoing
is in a simple design like this Echo Shell:


First stitch a half or
quarter circle shape, then travel stitch a distance away, then echo the circle
shape, creating a second ring to the circle.
Continue to echo as many times as you like, then stitch a new circle
shape and travel and echo quilt it as well.
Advice for learning free
motion quilting
In this article we’ve learned
5 quilting designs, and on the Free Motion Quilting Project you can find over
365 designs to choose from as well!
This might lead you to think
that every quilt you make needs 100 designs, but the truth is, the best
possible way to learn free motion quilting is to practice only 1 design.
By focusing on just 1 design,
you will be able to quickly memorize the design and how it works, then be able
to focus on how to move and position the quilt, how to place your hands and
grip the quilt.
Free motion quilting can be
an overwhelming skill to learn simply because it’s a totally new way to use a
sewing machine, a totally new way to move a quilt with a full free range of
motion. By focusing on one single
design, you can simplify the learning process and gain useful skills quickly.
The biggest key is to have
fun and allow yourself to learn, make mistakes, and even stitch ugly stitches
with no judgment!
Let’s go quilt,
Leah Day
Hi I'm just started FMQ and was wondering how you did the red with the white on it? Is this just from the thread? It's beautiful
ReplyDelete