
I made these two tote bags from the fabric left over (I still have a lot more of the fabric) from the Sassy Modern Quilt you can see in the background.
They were so quick and easy to make that I just had to write a tutorial for them for you all.
The tutorial is also available as a PDF download on the Bernina Blog that I am an author on.
So here's a tutorial for the World's Easiest Tote Bag!!!
The tutorial also includes making a zipper pocket and some wonderful bag handles!

Finished Size : 12” x 4” x 18”
Material required
Material required
Outer Main Fabric - ½ Yard
Outer Cuff Fabric - Fat Quarter
Lining Fabric - 1 Yard
Batting - 18” x 42”
Lightweight Interfacing - 18” x 42”
1 ½ “ Webbing - 72” long
Zipper - 7-8”
Magnetic Snap - 1 No
For your sewing machine
Foot No 1D (For the 7 series) or Bernina Walking Foot
Zipper Foot
Stretch Needles – I prefer using Stretch Needles when I have to stitch multiple layers. I find it gives me a better finish then using the ‘Universal’ Needles.
Thread – I suggest using a strong cotton thread. I use 40 wt Aurifil Thread to stitch bags. I find it has better strength to hold together the multiple layers as compared to regular 50 wt thread.
Cutting Instructions
From your Outer Main Fabric (F)
Cut F1 14” x 17.5” 2 Nos
From Outer Cuff Fabric (C)
Cut C1 6” x 17.5” 2 Nos
From Lining Fabric (L)
Cut L1 1.5” x 17.5” 2 Nos
L2 3.5” x WOF 2 Nos
L3 9” x 7” 2 Nos
L4 11” x 7” 2 Nos
L5 20.5” x 17.5” 2 Nos
From the webbing, Cut 2 pieces 36” long
From the Batting
Cut B1 21” x 18” 2 Nos
From the Interfacing
Cut I1 21” x 18” 2 Nos
Instructions
Step 1 : Making the Bag Straps
Take your lining pieces – L2 (3.5” x WOF) – and the two Webbing pieces.
Fold the lining pieces in half and then again to make double fold tape.
Cut it to 36” length.
Attach the Foot No 1D (and lower the Dual Feed System) or attach the walking foot to your machine.
Align the tape to the webbing along the center and start top-stitching the open edge.

Continue stitching along the entire edge.
Repeat on the other side.
Repeat for the other strap.
Your straps are ready.

Step 2 : Preparing the outer shell
Lay one of your Outer Main Fabric piece – F1, Right Side Up, on one of your Batting piece – B1, aligning one of the 17.5” side to the 18” side of the batting.
Pin in place.
Take your Lining Fabric piece – L1, Right Side Down, and align it to the other 17.5” size of F1.
Pin in place.
Lay one of your Outer Main Fabric piece – F1, Right Side Up, on one of your Batting piece – B1, aligning one of the 17.5” side to the 18” side of the batting.
Pin in place.
Take your Lining Fabric piece – L1, Right Side Down, and align it to the other 17.5” size of F1.
Pin in place.

Stitch along the edge.
Open and press.
Now, mark 4” from both the ends, as shown.
Open and press.
Now, mark 4” from both the ends, as shown.

Align the strap prepared in Step 1, Right Side Down, with its outer edge adjacent to the mark.
Take care that the strap is straight.

Pin or baste in place.
Now lay your Outer Cuff Fabric piece – C1, Right Side Down, and pin along the 17.5” edge.

Stitch along the pinned side. Backstitch over the straps for added strength.
Open and press.

Carefully, top-stitch 1/8” near the seam.
Be extremely careful when you reach the strap. It has multiple layers and can break your needle.
Baste stitch on all four sides using the longest stitch on your machine. DO NOT STITCH DOWN THE STRAPS.
Your Outer Panel is ready.
Repeat the steps for the other Outer Panel.
Lay both the outer panels Right Sides Together.
Pin along both sides and bottom.
Stitch along the pinned edges.
To box the corners align the seams by folding the corners at 45” as shown and marking a line 2” from the corner.
Stitch along this line. Cut off the extra corner.
Repeat for the other side.
Turn the bag Right Side Out.
If you want you can iron on some Stiff Interfacing to the bottom of the bag.

Your Bag Outer Shell is ready.

Step 3 : Making the Lining Shell
Note : One side of our lining has a zipper pocket and the other has a regular open pocket. Making these pockets is optional. You can directly skip to putting together the Shell if you do not want to make these pockets.
First Iron on the Interfacing pieces –I1, to the Wrong Side of the Lining Fabric pieces – L5.


Zipper Pocket:
Align one of the Lining Fabric Pieces – L3, with the center of the 17.5” size of the Fused Piece L5 at about 4.5 – 5” from the TOP edge.
Pin in place.
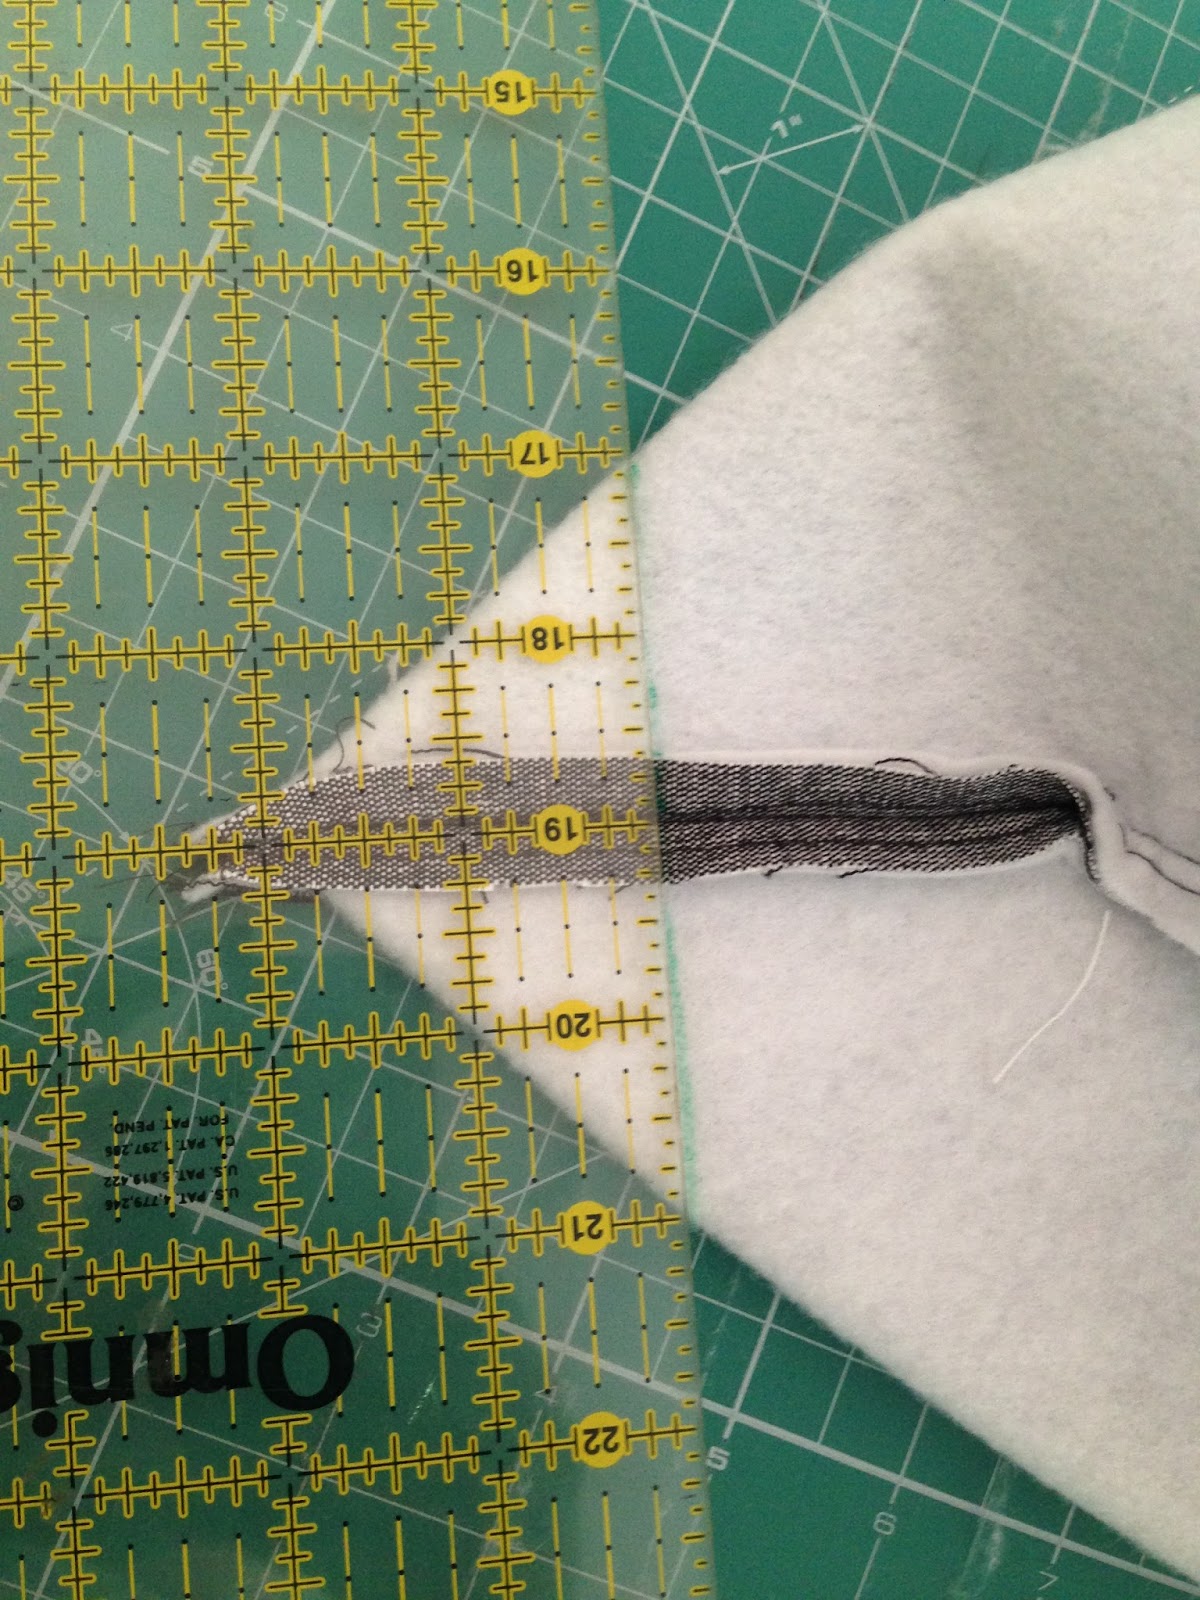
On the Lining Piece L3, mark a rectangle 0.5” x 7.5” – at 1” from the top edge (see photo below)

Stitch along the marked rectangle.
Using a sharp pair of scissors cut a line along the center of the rectangle making a Y-cut at both the ends. Be careful not to cut the stitches, but to cut at close to the seam as possible.

Turn the fabrics inside out through the cut so that they lie Wrong Sides Together.

Press the seams firmly. I recommend using steam or starch to hold the shape in place.
Place the panel on a flat surface, the Right Side of Pocket piece L3 facing up.
Align the Zipper – Right Side Down, along the opening. Pin in place.
Place the panel on a flat surface, the Right Side of Pocket piece L3 facing up.
Align the Zipper – Right Side Down, along the opening. Pin in place.
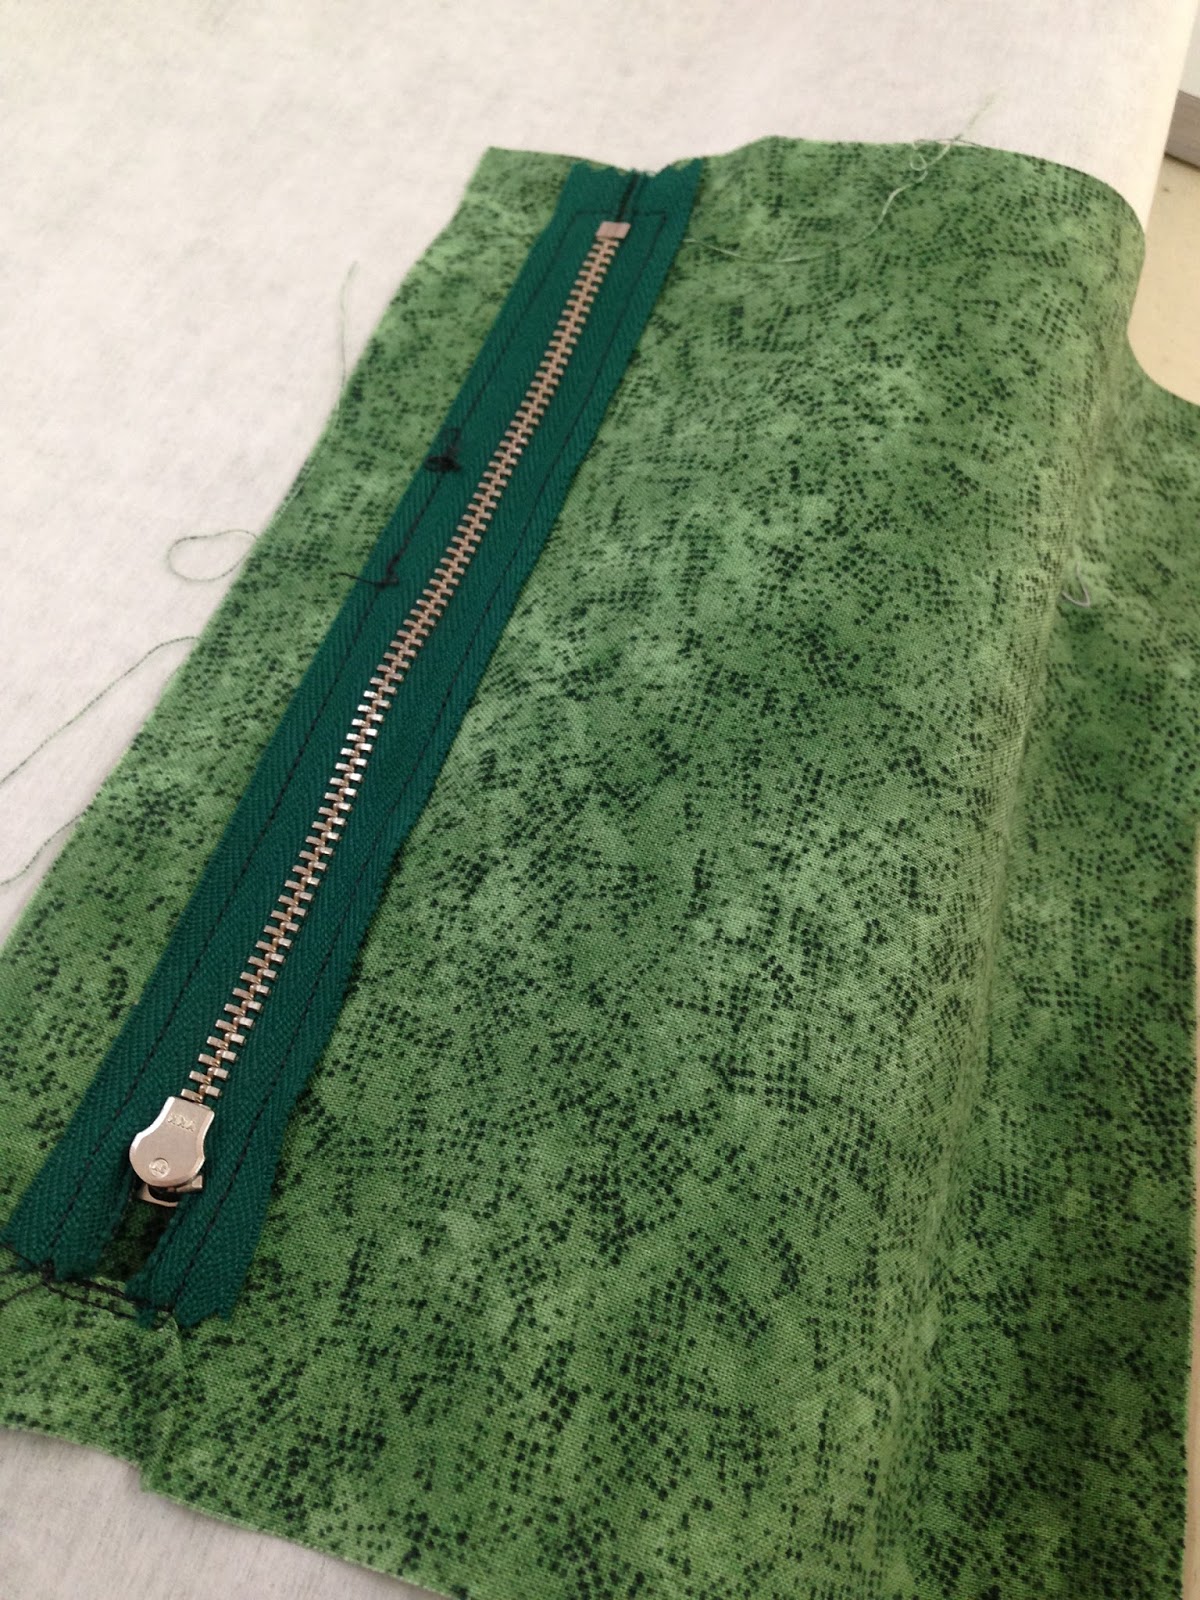
Now attach the Zipper Foot to your machine and stitch the zipper in place by top-stitching along the edges of the opening.

Now, turn over the panel. Place the other Lining piece – L3 over the pocket piece Right Sides Together. Pin along the edges.
Stitch down the edges to finish the Zipper Pocket.
Regular Pockets
Take the 2 Lining Fabric Pieces – L4, Right Sides Together.
Pin along all four sides and stitch leaving an opening on 1 ½” to turn on one side.
Clip corners and turn the pocket Right Sides Out.
Take the 2 Lining Fabric Pieces – L4, Right Sides Together.
Pin along all four sides and stitch leaving an opening on 1 ½” to turn on one side.
Clip corners and turn the pocket Right Sides Out.

Top Stitch along one of the long edges. This will be the TOP edge.

Align the Pocket piece with the Fused Lining piece – L5, as desired.
I prefer aligning it at level with the zipper of the zipper pocket on the other panel.
Mark a line parallel to the shorter edge of the Pocket piece. This will make a compartment for a phone.
Stitch along the sides, the compartment line and the bottom to attach the pocket piece to the Panel. Make sure you back stitch at the top of the pocket for added strength.

Now trim down the excess Interfacing from the edges of both the Lining Panel.

Lay your Lining Pieces Right Sides Together, making sure that the directions are right. Pin along the edges and stitch along the sides and the bottom, leaving an opening of about 6-8” to turn the bag.

Once again, box the corners, following instructions in Step 1 above.

Your Lining Shell is ready.
Putting together the bag:
Insert your Outer Shell into the Lining Shell – Right Sides Together. Pin along the top edges.
Remove your extension table from the machine and use the Free Arm to stitch along the edge.
Putting together the bag:
Insert your Outer Shell into the Lining Shell – Right Sides Together. Pin along the top edges.
Remove your extension table from the machine and use the Free Arm to stitch along the edge.

Turn your bag Right Side Out through the opening in the lining piece.

Attach the Magnetic Snap at the center of the Lining piece about 1.5-2” from the top edge.
Follow the manufacturer’s instructions to attach it.
Use clips to hold together the edge while you top-stitch the top edge. I like to use my Wonder Clips. Make sure you include the straps when you stitch.
Follow the manufacturer’s instructions to attach it.
Use clips to hold together the edge while you top-stitch the top edge. I like to use my Wonder Clips. Make sure you include the straps when you stitch.

I like to top stick again, at ¼” from the first stitch to add strength to the bag.
Close the opening in the Lining Shell by hand stitching or top stitching.
Your Tote Bag is ready to flaunt!
Close the opening in the Lining Shell by hand stitching or top stitching.
Your Tote Bag is ready to flaunt!

If you make a bag with this tutorial, do share pictures with me so I can share them on my Facebook Page
Do you like the Tote? And do you also find it to be the easiest Tote in the world?
Do you like the Tote? And do you also find it to be the easiest Tote in the world?
Cheers!!!

Awesome tutorial and great looking tote bag. Thank you.
ReplyDeleteI do have a question and a problem.
First, in the cutting instructions you have the same thing at the end of almost all and I have never seen that so I'm not sure what it means. You've added "2 Nos" after many of them. What does 2 Nos mean please?
The problem is the link to the Bernina Blolg is not correct. It doesn't go anywhere. Could you please check that and correct it so the pdf can be downloaded for those of us who would like it?
Thank you for the help.
What a great tutorial! Thanks so much!!! Your totes are awesome!!!
ReplyDeleteyou shared useful post. Nice tutorial. Thanks for sharing.
ReplyDeletenon woven bags machine
Enjoyed reading this post Shruti. Would love it if you could do a similar post on Designer Blazers for Men
ReplyDeleteWow! Such an amazing and helpful post this is. I really really love it. It's so good and so awesome. I am just amazed. I hope that you continue to do your work like this in the future also tote bag printing singapore
ReplyDeleteYou can pick whichever shading you pp mesh bag wholesale like or the plan you like.
ReplyDeleteA round of applause for your blog article. Really thank you! Want more.https://thecanvastotebag.weebly.com/
ReplyDeleteYou have a real ability for writing unique content. I like how you think and the way you represent your views in this article. I agree with your way of thinking. Thank you for sharing. tote bag singapore
ReplyDeleteIf it's not too much trouble share more like that. yupoo bags
ReplyDeleteI appreciate the efforts which you have put into this article about Cotton Bags Exporter. This post provides a good idea. Genuinely, it is a useful article to increase our knowledge. Thanks for sharing such articles here.
ReplyDeleteThanks so much for this information. I have to let you know I concur on several of the points you make here and others may require some further review, but I can see your viewpoint. https://customtotebags11s-website.yolasite.com/
ReplyDeleteI was surfing the Internet for information and came across your blog. I am impressed by the information you have on this blog. It shows how well you understand this subject. xheck canvas tote bag price
ReplyDeleteThank you for your blog. Much thanks again. Really Cool.
ReplyDeletecheck more info here about tote bag
Hello I am so delighted I located your blog, I really located you by mistake, while I was watching on google for something else, Anyways I am here now and could just like to say thank for a tremendous post and a all round entertaining website. Please do keep up the great work. canvas bag singapore
ReplyDeleteI like your post. It is good to see you verbalize from the heart and clarity on this important subject can be easily observed... canvas tote bags
ReplyDeletePretty good post. I just stumbled upon your blog and wanted to say that I have really enjoyed reading your blog posts. Any way I'll be subscribing to your feed and I hope you post again soon. Big thanks for the useful info. https://canvas-tote-bag.weebly.com/a-guide-to-applying-wax-to-a-canvas-tote-bag
ReplyDeleteThis is my first time i visit here. I found so many interesting stuff in your blog especially its discussion. From the tons of comments on your articles, I guess I am not the only one having all the enjoyment here keep up the good work Pinstripe Suits Fashionable for Lawyers
ReplyDeleteI haven’t any word to appreciate this post.....Really i am impressed from this post....the person who create this post it was a great human..thanks for shared this with us. https://medium.com/@easyprintsg3/canvas-handbags-utility-is-back-in-style-136d24fba667
ReplyDeleteThis is my first visit to your web journal! We are a group of volunteers and new activities in the same specialty. Website gave us helpful data to work. singappore best canvas bag
ReplyDeleteThis is such a great resource that you are providing and you give it away for free. I love seeing blog that understand the value of providing a quality resource for free. get more info about canvas tote bags
ReplyDeleteThanks so much for this information. I have to let you know I concur on several of the points you make here and others may require some further review, but I can see your viewpoint. get canvas bag printing
ReplyDeleteThis particular is usually apparently essential and moreover outstanding truth along with for sure fair-minded and moreover admittedly useful My business is looking to find in advance designed for this specific useful stuffs… https://roses-site.yolasite.com/
ReplyDeleteIf we tell you that you can also wear a jacket blouse with Banarasi lehenga, then how it will be and it will be a total bomb and you will look very chic. Banarasi lehenga has metallic shimmer gray blouse with jacket that gives a modern co-ethnic look. Loose hair and polka beaded choker necklace is perfect to complement the entire look. Below maroon Banarasi lehenga with a jacket styled blouse has full sleeves and some sheer, making it perfect for both a day and a night event. You can either wear it for a reception or even the mehndi function. What about a waistcoat rather than a full fledged jacket? Sounds interesting? This bride took it to on herself and got a waistcoat customized to go with her Banarasi lehenga, customized from her granny’s sarees.
ReplyDeleteI think this is an informative post and it is very useful and knowledgeable. therefore, I would like to thank you for the efforts you have made in writing this article. plain tote bags singapore
ReplyDeleteWow, What a Excellent post. I really found this to much informatics. It is what i was searching for.I would like to suggest you that please keep sharing such type of info.Thanks canvas tote bags price in singapore
ReplyDeleteReally I enjoy your site with effective and useful information. It is included very nice post with a lot of our resources.thanks for share. i enjoy this post. customised bag singapore
ReplyDeleteGreat survey, I'm sure you're getting a great response. bag printing in singapore
ReplyDelete