SOCIAL MEDIA

Tuesday, January 21, 2020

BERNINA needle punch tool - product review and tutorial

I have been a Bernina Brand Ambassador since 2014. One of my first purchases was a needle punch tool that I used to make a lovely quilt using some soft Merino Wool fibres I had purchased from the Bernina Creative Center. Today I am going to show you how you can use the BERNINA Needle Punch Tool.
bernina-needle-punch-tool-product-review-tutorial
First a little about the product. 
1. Different tool for different hook types. The hook type of your machine determines which tool you will be using. The mechanism of the machine varies depending on the hook type. My 330 has a CB hook while my 710 has a Rotary hook. I have the CB hook tool which does not work on the 710. So make sure that you tell your dealer the model number of your machine before buying it.
2. The needles are sharp. The needles that accompany the tool are not just sharp, but also have serrated edges. So handle them carefully.
3. The needles are delicate. The needles are very delicate and can bend even with the slightest pressure. A bent needle usually breaks in the process. So be careful when handling it and even while using it.
4. You have to work VERY slowly. The needle punch tool is not meant for sprint sessions. You have to work very slowly to make it work without breaking. Be careful while moving the fabric and the edges of the needle might get caught in it and bend/break.
All said, I love this tool for the innumerable opportunities it opens up for me. I can not only use it to felt wool, but also to  create a textured surface by punching roving (fibers that have been carded and combed, but not spun), yarn, or fabrics into a base or background fabric. 
Today I will show you how to make this cute little mini quilt using some merino wool.

Material Required :
Felt – Assorted Fibers
Cotton batting (used as base to felt fibers) you can also use a Felt Sheet instead.
Thread (for quilting)
Backing and binding fabric
Bernina Needle Punch Tool – Check the compatibility with your machine and buy accordingly
Bernina Free Motion Quilting Foot (Number 29/29C) (for Quilting)
Instructions :

1. Gather all your Felt Fibers.


2. Cut them up into strips slightly longer than your batting(or felt sheet) piece. Start laying them on the piece of batting (or a felt sheet) in one direction. Continue till you cover most of the surface.


3. Now cut strips slightly larger than the width of the piece. Start ‘weaving’ your felt fibers into the strips you laid out before. Continue till you are completely satisfied with the look.


This is what my piece looked like after I was done. I did remove a few pieces and cut away a few while I felted it.


Carefully pick up your piece and take it to the machine.

4. Attach the Bernina Needle Punch Tool to the machine as per the instructions included.

bernina-needle-punching-tool

5. Start from the center and work at a slow speed, making sure that all the fibers are needle felted into the batting / felt.


6. Now using the Bernina Free Motion Quilting Foot (Number 29/29C) or the Bernina Stitch Regulator quilt the top using a design of your choice.

I used a black Aurifil 50 wt thread both on the top and bottom to quilt it.
bernina-needle-punch-tool-tutorial
Have you tried the BERNINA needle punch tool? Make sure to visit your local dealer and try it out. You will love it. The possibilities are endless!
Tuesday, January 14, 2020

Tiny, Precise, Piecing: Tips by Emily Lang

Welcome all, here's the first guest post on my blog! Yay!!! 
emily-lang-tips-for-tiny-precise-piecing
Today on my blog, I have invited my BFF, my sister from another mother - Emily Lang. Yes, she is the one my Bernina 330 is named after! She is super well known for all the tiny piecing that she does. That's the reason she is talking today about tiny, precise piecing!
emily-lang
Hello! I’m Emily Lang, you might remember me from past guest appearances here on Shruti’s blog, or from my own blog and instagram, Mommy’s Nap Time. I've been sewing for about twenty years, and fell in love with quilting after my daughter was born. I love to design quilts, and I love quilt math! Writing patterns is my passion, and I have published over 30 patterns available in various quilt magazines worldwide. Check out my newest pattern Shades Quilt available on Craftsy.
I’m here today to talk about tiny piecing, and ways to maintain precision while piecing with small pieces.
emily-lang-tiny-piecing-tutorial

  • Use your scraps! Tiny piecing only requires small scraps, so grab some of your favorite fabrics and cut some 1” x 4” strips, and some 2 1/2” x 2 1/2” squares.
  • Cutting matters! It is very important to measure and cut accurately. There is no room for error in cutting accuracy, every little millimeter of wobble will show in the end product!
  • Switch your needle plate out for a straight stitch needle plate. This needle plate has a smaller opening, and is less likely to pull your fabric in!
  • Lower your stitch length. For regular piecing I would use a 2.5 stitch length, for tiny piecing I would take it down to just under 2.
  • To avoid loose stitches at the beginning of your seam, stitch through a scrap before beginning your seam, leave the threads connected, and start chain piecing your small pieces. Some people call this a leader / ender, but I just use the same scrap until it’s too messy to use anymore.
  • Always sew with a scant 1/4” seam allowance. Accuracy is much harder when we try to use an 1/8” seam allowance, there isn’t any need to reduce the seam allowance.
  • Press the seams open. This reduces bulk and helps to see when lining up the little pieces.
emily-lang-tiny-piecing-tips
  • For half square triangles (HST) cut larger squares (2 1/2” x 2 1/2”) and sew the HST units in the normal fashion. After you press the finished HST, trim each one to 1 1/4” x 1 1/4”. It’s easier to accurately sew a larger unit, trimming it will provide the teeny end product, without the craziness of sewing a 1” bias seam!
  • Sew all the little bits together. Log cabins, friendship stars, improv., anything is possible!

With these tips you’re ready to start a mini project! The practice piecing here would make a great front for a zippered pouch, or it might become a mug rug or mini quilt!
emily-lang-tiny-piecing-tips
Wednesday, September 7, 2016

Super Easy Wallet Tutorial!!!


I said it, this is a tutorial for a SUPER easy wallet!!! I have used Faux leather to make these. The edges are raw. If you want to use fabric, you will have to finish the edges before you can use. Other options could be Pure leather, Suede, Vinyl or Felt


You will need
1. Faux Leather - In two contrasting colors of your choice. 
Cut - From the outer faux leather : ONE piece 9" x 9" & TWO pieces 2.25" x 7.5"
        From the lining faux leather : ONE piece 9" x 9", TWO pieces 1.75" x 7.5" & TWO pieces 2.75" x 7.5"

2. Interfacing - Thin but stiff. I used what is locally called the "Dhoti Canvas" or "Buckram" Its as thick as a card paper and can be ironed on to fabric. I like to cut the interfacing about 11" x 11". Make sure you cover the ironing board with a piece of fabric that you can throw away if you do that!
Cut TWO pieces 9" x 9"

3. Thread - Use a thread to match the lining faux leather. I used 40 wt Aurifil  cotton thread. It is bold enough to show off on the outer side!

4. You will also need a temporary marking pen. I used Frixion to mark my wallets. 

That's all you need! Lets get started!

Step 1 : Iron the 9" Interfacing squares to the wrong side of the Faux Leather. I lay down the leather piece RIGHT SIDE DOWN and follow by the interfacing and iron it.

Step 2 : Mark on the lining Faux leather. 
Use the dimensions from the picture to mark on the lining faux leather. 
Hint : I have made templates from card paper - 4" x 8" and 2.75" x 7.5" and use them to mark. Its super fast that way!
Mark the centers of at least one of the 7.5" side. I marked both in this case, but I am going to use just one of those.


Step 3 : Place the pocket pieces in the order - 2.75" wide, 2.25" wide & 1.75" wide on both the 2.75" x 7.5" rectangles that you have drawn. Use painter's tape or masking tape to secure it.


Step 4 : Stitch them down. Starting at one corner stitch down the OUTER 3 sides of the first pocket. Backstitch at the start and the end. 


At the corner, take the needle down and pivot. Just lift the tape to let the presser foot pass. 


When stitching the other pocket, you will also have to stitch down the middle to make credit card pockets. That's what we marked the center of the 7.5" side for.

To make these pockets, start like you did earlier. Remember to backstitch when you start. And stitch along the edge. Pivot at the corner and stitch till you reach near the center mark. Now take a piece of card paper and align it with the two points you have marked. Stitch right up to the edge of the paper. 


Pivot holding the paper in place. Stitch along the paper till you reach the edge of the pocket. Remove the paper and backstich. 

Pivot and turn around and stick back along the line. Till you reach the original line. Now pivot again and continue like you did for the first pocket.


Your lining piece is ready. 


Cut away the excess interfacing (if any) and remove the painter's tape.

Step 5 : Layer and tape the Outer leather Right Side Down and the Lining piece with the pockets Right Side Up. This is why I like to leave the interfacing a little larger, so I can just tape them together. You can also use wonder clips instead.


Starting at the intersection of the center line and the outer square, Start stitching along the outer square. Make sure to backstitch at the beginning. When you reach the corner, put the needle down and pivot.


After you have stitched all around, pivot and stitch along the center line. This is the line where the wallet will be folded. When you reach the other end, once again, pivot and stitch to reach the starting point. Doing this helps in keeping the wallet folded! Backstich at the end and you're done!!!


Remove all the painters tape and trim your wallet. Cut at about 1/8" from the outer stitch lines


Take your wallet to the ironing board and cover it with a fabric and iron to remove the Frixion markings. Fold along the center line and iron again. 


Your wallet is ready to use!!!


Keep it under a book for a while so that it retains the fold. Even keeping it bound by a rubber band helps.


Use a sharpie or a permanent marker to color the edges to match one of the two colors you have used. There are more detailed methods used to finish edges, but remember this is the SUPER EASY Wallet!!! So I will use what I have on hand!


Carry it around and flaunt it!!! I attached my new wooden label to it. I DID NOT SEW IT ON. I just used the thread I used to stitch the wallet to sew through the holes a few times and then hot glued it on!


If you make one of these, please share them with the hashtag #ShrutiDandekar so that I can see them! I would love to share them too!!! Go on, I just made 50 in 3 days! How many can you make?


www.fatquartershop.com


Wednesday, April 27, 2016

52 prompts to blog every week: Week 17


I am a self taught quilter. There are techniques that I have learnt myself, ones I have learnt from the net, ones learnt from others at quilt meets and Quiltcon, some I have dreamt about and then a few more...

Of all of them, I love the technique I use in my book,'About face' the most. Its a kind of reverse applique, but then, not quite so!

I used it for the first time in my Harry Potter quilt.


I have made portraits with it and written a book and taught classes, both online and in person.

The first portrait I made using the technique was that of Steve Jobs. I made the iQuilt for my little brother. 


And then I also made this portrait of Alex Veronelli of Aurifil Threads! He was brave enough to be the subject for my eBook. I had the pleasure of meeting him at Quiltcon and handing over the quilt I made for him!


I have been taking classes to teach this technique, both online and in person. My students have come up with brilliant works of art!!!

And I'm really proud of them.

Here are my students at the Bernina Creative Center, Mumbai.


So this is that one technique I love and cherish the most.

Here's a small tutorial.

Supplies : Fabric - minimum 2 of the same size, thread (that matches either of the fabrics), a pair of SHARP scissors (I love my stork scissors for this one), seam ripper, temporary fabric marker.

1. Draw the design onto the topmost fabric. I suggest you take the lightest fabric on the top.


Now using the thread, I use Aurifil monofilament thread, and your FMQ foot, stitch through all the layers of fabric. Use a small stitch length. On my BSR I use a stitch length of 1 - 1.5.


Now use your seam ripper and/or your sharp scissors to cut away the layer(s) according to your design. Take care to cut as close to the stitch line as possible.


I use the seam ripper for tinier areas that I need to cut away.


Here's the result :  On the top is my reverse applique piece and on the bottom is the original print.


If you want to know more about creating portraits using this technique, I would highly recommend my own book (how modest!).

You can buy it here at Fat Quarter Shop

Which is your favorite technique? Do share about it so that we can all get to know it!

Cheers!!!


www.fatquartershop.com


Saturday, May 30, 2015

Tutorial : World's Easiest Tote Bag

I made these two tote bags from the fabric left over (I still have a lot more of the fabric) from the Sassy Modern Quilt you can see in the background.

They were so quick and easy to make that I just had to write a tutorial for them for you all.

The tutorial is also available as a PDF download on the Bernina Blog that I am an author on.

So here's a tutorial for the World's Easiest Tote Bag!!!

The tutorial also includes making a zipper pocket and some wonderful bag handles!


Finished Size : 12” x 4” x 18”

Material required
Outer Main Fabric -  ½ Yard
Outer Cuff Fabric - Fat Quarter
Lining Fabric - 1 Yard
Batting - 18” x 42”
Lightweight Interfacing - 18” x 42”
1 ½ “ Webbing - 72” long
Zipper - 7-8”
Magnetic Snap - 1 No
For your sewing machine
Foot No 1D (For the 7 series) or Bernina Walking Foot
Zipper Foot
Stretch Needles – I prefer using Stretch Needles when I have to stitch multiple layers. I find it gives me a better finish then using the ‘Universal’ Needles.
Thread – I suggest using a strong cotton thread. I use 40 wt Aurifil Thread to stitch bags. I find it has better strength to hold together the multiple layers as compared to regular 50 wt thread.

Cutting Instructions
From your Outer Main Fabric (F)
Cut     F1    14” x 17.5”    2 Nos
From Outer Cuff Fabric (C)
Cut     C1    6” x 17.5”    2 Nos
From Lining Fabric (L)
Cut     L1    1.5” x 17.5”    2 Nos
    L2    3.5” x WOF    2 Nos
    L3    9” x 7”        2 Nos
    L4    11” x 7”        2 Nos
    L5    20.5” x 17.5”    2 Nos
From the webbing, Cut 2 pieces 36” long
From the Batting
Cut    B1     21” x 18”    2 Nos
From the Interfacing
Cut     I1    21” x 18”    2 Nos
 

Instructions
Step 1 : Making the Bag Straps
Take your lining pieces – L2  (3.5” x WOF) – and the two Webbing pieces.
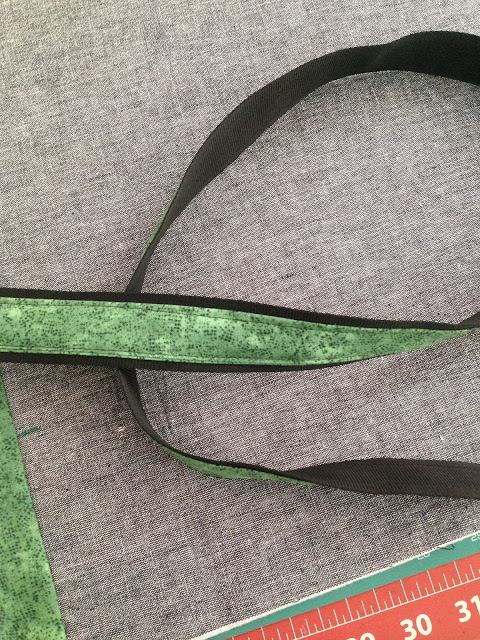
Fold the lining pieces in half and then again to make double fold tape.
Cut it to 36” length.
Attach the Foot No 1D (and lower the Dual Feed System) or attach the walking foot to your machine.
Align the tape to the webbing along the center and start top-stitching the open edge.


Continue stitching along the entire edge.
Repeat on the other side.
Repeat for the other strap.
Your straps are ready.


Step 2 : Preparing the outer shell
Lay one of your Outer Main Fabric piece – F1, Right Side Up, on one of your Batting piece – B1, aligning one of the 17.5” side to the 18” side of the batting.
Pin in place.
Take your Lining Fabric piece – L1, Right Side Down, and align it to the other 17.5” size of F1.
Pin in place.


Stitch along the edge.
Open and press.
Now, mark 4” from both the ends, as shown.


Align the strap prepared in Step 1, Right Side Down, with its outer edge adjacent to the mark.
Take care that the strap is straight.


Pin or baste in place.
Now lay your Outer Cuff Fabric piece – C1, Right Side Down, and pin along the 17.5” edge.


Stitch along the pinned side. Backstitch over the straps for added strength.
Open and press.


Carefully, top-stitch 1/8” near the seam.
Be extremely careful when you reach the strap. It has multiple layers and can break your needle.

Baste stitch on all four sides using the longest stitch on your machine. DO NOT STITCH DOWN THE STRAPS.
Your Outer Panel is ready.
Repeat the steps for  the other Outer Panel.
Lay both the outer panels Right Sides Together.
Pin along both sides and bottom.
Stitch along the pinned edges.
To box the corners align the seams by folding the corners at 45” as shown and marking a line 2” from the corner.


Stitch along this line. Cut off the extra corner.
Repeat for the other side.
Turn the bag Right Side Out.
If you want you can iron on some Stiff Interfacing to the bottom of the bag.


Your Bag Outer Shell is ready.


Step 3 : Making the Lining Shell
Note : One side of our lining has a zipper pocket and the other has a regular open pocket. Making these pockets is optional. You can directly skip to putting together the Shell if you do not want to make these pockets.
First Iron on the Interfacing pieces –I1, to the Wrong Side of the Lining Fabric pieces – L5.


Zipper Pocket:
Align one of the Lining Fabric Pieces – L3, with the center of the 17.5” size of the Fused Piece L5 at about 4.5 – 5” from the TOP edge.
Pin in place.
On the Lining Piece L3, mark a rectangle 0.5” x 7.5” – at 1” from the top edge (see photo below)


Stitch along the marked rectangle.
Using a sharp pair of scissors cut a line along the center of the rectangle making a Y-cut at both the ends. Be careful not to cut the stitches, but to cut at close to the seam as possible.

 
Turn the fabrics inside out through the cut so that they lie Wrong Sides Together.


Press the seams firmly. I recommend using steam or starch to hold the shape in place.
Place the panel on a flat surface, the Right Side of Pocket piece L3 facing up.
Align the Zipper – Right Side Down, along the opening. Pin in place.


Now attach the Zipper Foot to your machine and stitch the zipper in place by top-stitching along the edges of the opening.


Now, turn over the panel. Place the other Lining piece – L3 over the pocket piece Right Sides Together. Pin along the edges.
Stitch down the edges to finish the Zipper Pocket.
 
Regular Pockets
Take the 2 Lining Fabric Pieces – L4, Right Sides Together.
Pin along all four sides and stitch leaving an opening on 1 ½” to turn on one side.
Clip corners and turn the pocket Right Sides Out.


Top Stitch along one of the long edges. This will be the TOP edge.


Align the Pocket piece with the Fused Lining piece – L5, as desired.

I prefer aligning it at level with the zipper of the zipper pocket on the other panel.
Mark a line parallel to the shorter edge of the Pocket piece. This will make a compartment for a phone.
Stitch along the sides, the compartment line and the bottom to attach the pocket piece to the Panel. Make sure you back stitch at the top of the pocket for added strength.

Now trim down the excess Interfacing from the edges of both the Lining Panel.


Lay your Lining Pieces Right Sides Together, making sure that the directions are right. Pin along the edges and stitch along the sides and the bottom, leaving an opening of about 6-8” to turn the bag.


Once again, box the corners, following instructions in Step 1 above.


Your Lining Shell is ready.


Putting together the bag:
Insert your Outer Shell into the Lining Shell – Right Sides Together. Pin along the top edges.
Remove your extension table from the machine and use the Free Arm to stitch along the edge.


Turn your bag Right Side Out through the opening in the lining piece.


Attach the Magnetic Snap at the center of the Lining piece about 1.5-2” from the top edge.
Follow the manufacturer’s instructions to attach it.
Use clips to hold together the edge while you top-stitch the top edge. I like to use my Wonder Clips. Make sure you include the straps when you stitch.


I like to top stick again, at ¼” from the first stitch to add strength to the bag.
Close the opening in the Lining Shell by hand stitching or top stitching.
Your Tote Bag is ready to flaunt!

If you make a bag with this tutorial, do share pictures with me so I can share them on my Facebook Page

Do you like the Tote? And do you also find it to be the easiest Tote in the world?

Cheers!!!

www.fatquartershop.com