SOCIAL MEDIA

Monday, February 24, 2014

ASQA : Post # 3 : Block # 2 & 8


Here are my next two blocks.
Block # 2 & 8 for the Among the Stars Quilt Along.

These involve much more piecing. And there are a lot many points to match!

This is so not my regular style of quilting.

But since its just 2 blocks at a time, I am actually enjoying it!

Here's block # 2


 And block # 8


Here are all the blocks completed so far.


I really love the low volume look of this quilt. It is so different from my normal colorful work!
I have a lot of scraps left after making this one. I will surely make another quilt from it!


Here's the schedule again
February 10 : Cutting Instructions
February 17 : Block 1 & 7
 February 24 : Block 2 & 8 ----> This is today
March 03 : Block 3 & 9
March 10 : Block 4 & 10
March 17 : Block 5 & 11
March 24 : Block 6 & 12
March 31 : Putting the Quilt top together
April 7 : Finishing
April 14 : Show off!!!

The pattern is available in both PDF format and print format from Fat Quarter Shop

Until next time

Cheers!!! 


Thursday, February 13, 2014

ASQA : Post # 2 : Blocks 1 & 7

Here's my first two blocks.
Block number 1 & 7 for the Among the Stars Quilt Along (ASQA)

I did deviate from the directions and made the hourglass blocks without cutting up the squares into triangles as instructed in the pattern. I used the shortcut method of fast hourglass blocks.

Here's my block # 1


and here's my block # 2


I'm VERY bad at doing precision piecing, so this one was a bit of a challenge! But I'm happy with my blocks!!! 

Dont they look like happy blocks?

Looking forward to making the next ones!!!

Here's the schedule again
February 10 : Cutting Instructions
February 17 : Block 1 & 7  -----> Thats today
February 24 : Block 2 & 8
March 03 : Block 3 & 9
March 10 : Block 4 & 10
March 17 : Block 5 & 11
March 24 : Block 6 & 12
March 31 : Putting the Quilt top together
April 7 : Finishing
April 14 : Show off!!!


The pattern is available in both PDF format and print format from Fat Quarter Shop

Until next time

Cheers!!! 


Monday, February 10, 2014

ASQA : Post # 1 : Cutting Instructions


Hiya all!

Finally, here's the first post on the ASQA!

Cutting Instructions.


Assuming that you guys already have the pattern and have since then bought the fabric you need, you are ready to cut into the wonderful fabric.

I have chosen to make my quilt with a Low Volume Color Scheme. I combined the Moda Low Volume FQ bundle with a few other fabrics that blended into it and made up this lovely bundle!


First cut up the fabric as required for each block. And sort into bundles.

After that take a bundle at a time and cut up pieces for the blocks as per the instructions in the pattern.

 Since we will be making HSTs from the 2 - 7/8" square pieces, I cut them into 3" square pieces. I will be squaring up the HSTs after they're done so it should be okay.

I used those plastic filing folders to hold the pieces of the blocks together. I put a sheet of white paper in it and put pieces for two blocks on either side of that sheet.


I use one of the metal rings that we use to organize index cards to hold all the 6 folders together...


Now you're ready to start putting together the blocks.


Ready for the next set of instructions?


Thursday, February 6, 2014

ASQA Take 2

I'm getting my act together for the Among the Stars Quilt Along
And here's the revised schedule 

Here's the revised schedule!!!
February 10 : Cutting Instructions
February 17 : Block 1 & 7
February 24 : Block 2 & 8
March 03 : Block 3 & 9
March 10 : Block 4 & 10
March 17 : Block 5 & 11
March 24 : Block 6 & 12
March 31 : Putting the Quilt top together
April 7 : Finishing
April 14 : Show off!!!


I am going to make sure that I do not miss a single post this time, so when I'm writing it, I've already finished Blocks 3&9!!!

Looking forward to having a blast!!!

Cheers!!!


Monday, December 30, 2013

Among the Stars Quilt Along - ASQA

I am so excited to tell you that 2013 has been one of the most fabulous years I've had so far!!!

So much so, that I'm absolutely thrilled to announce my plans for the next year!!!

2014 will see a lot more happening at 13 Woodhouse Road!!!

But first up, is the Among the Stars Quilt Along - ASQA... Read on to know more...


Among the stars is a fabulous pattern written as a BOM (Block of the Month) for Its Sew Emma by Kimberly Jolly.

It is made up of 6 different blocks (2 of each kind to make a total of 12 blocks). The finished quilt measures 62.5" x 76.5".

Each blocks is a 'star' block made using squares and HSTs (Half Square Triangles). This pattern in a beginner friendly. It is available in both PDF format and print format from Fat Quarter Shop


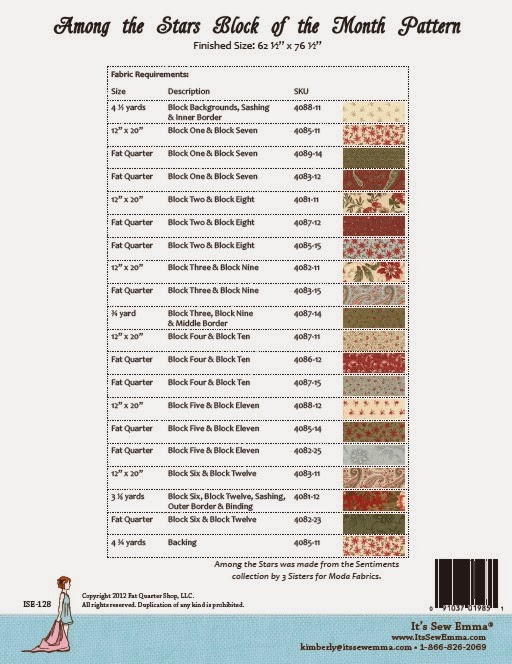
Here's the list of fabric that you'll need.


I am making it using the Moda Low Volume Fat quarter Bundle and a few additional low volume prints. But you can make it from your scraps too!!!

Here's the schedule :

January 6, 2014 : Cutting Instructions
January 9, 2014 : Block 1 & 7
January 13, 2014 : Block 2 & 8
January 16, 2014 : Block 3 & 9
January 20, 2014 : Block 4 & 10
January 23, 2014 : Block 5 & 11
January 27, 2014 : Block 6 & 12
January 30, 2014 : Putting together the Quilt Top
February 3, 2014 : Basting, Quilting & Finishing
February 10, 2014 : Showcase!

Ready to have fun of the ASQA???

Wondering what the finished quilt top will look like?


Here, the quilt is made from Moda's Sentiment Fabric. You can order fabric according to the fabric requirement or you can  use fabric from your stash!!!

Get your supplies ready and we'll kick off next week!!!

Cheers!!!

Sunday, December 22, 2013

Portrait Quilt Along

At the beginning of the last year, I did a Self Portrait Quilt Along!

And I'm doing it again! I'm starting the Portrait Quilt Along in the new year.


I will be teaching 3 different techniques and you can sign up for one or all 3 techniques. Send me an email to shruti[at]13woodhouseroad[dot]com for details.

It will be an online-only quilt along and will run for 3 months.

I will guide you through the process of making a portrait quilt using one of the following 3 techniques:
1. Raw Edge Applique : Probably one of the safest and fool proof method to make a portrait quilt. It is simple, yet time consuming.


2. Pixelated 4 patch : This is a method for those who love to precision piece! Easier on the cutting side and comes along pretty fast!

3. The Reverse Applique : The fastest method of the 3. Not for the beginner. Needs really good photographs though.


I will guide you through the process of photo selection, editing, preparing and finishing the quilt over the course of 3 months.

I am charging a minor fee for this Quilt Along this time.

Please email me if you're interested in doing it with me!

Cheers!!!

Thursday, July 4, 2013

Butt On!!!


Facebook is a place that has a lot of inspirations for me! Some in the form of words... While some, like this one, in pictures!!!

Ebony from Love Bug Studio, who by the way is working on making one of the awesome-st studios, showed off her recent purchase at Ikea on Tuesday (2nd July)...


And I immediately fell in love!!!

I knew I just had to make a wall quilt with that idea for my sewing room! 

But later on, I started thinking 3 dimensional! And Butt On was born!!!

I absolutely adore this quilt! And I'm really very proud that this is my original concept!!!

So here's presenting Butt On!!!


It is a decent 32" x 32". Perfect to brighten up and funkify a wall in my sewing room (I wish I had a wall to put this one up - but I'll find some place for it!)


All the buttons are in fact  circles that have a layer of batting inside!


I love the way the buttons  are stitched onto the back!


The backing is PERFECT for this quilt!!! Its bright and has polka dots! I mean, you can never go wrong with polka dots, can you?


I used my trusted Aurifil Black thread (wt 50) for piecing and quilting this baby!!! I love working with Aurifil threads - they leave so less lint behind!!! 


Would you like to do a butt-a-long with me???? Sometime in August???


Tuesday, December 25, 2012

The year that was!!! And the year that will be!


I can say that the year has been that of learning...

Here are a few things hat I learnt...

1. Trust people with caution. I do not say that do not trust them at all, you'll never make friends that way. But know them better before you trust them! I learnt it the hard way...

2. Believe in yourself! No matter what others say. You will be able to do things if you believe in yourself! Trust yourself, be a little more lenient... Overlook small flaws and work on the major ones!

3. Explore, experiment & experience! Explore new avenues, new areas that you never did before. Experiment with your skills, you'll be amazed at your results! And Experience the wonders of life when you do these things!

4. Forgive & Forget! Learn to forgive people and forget the bad things they said/did to you! Look for the good in mankind. And you'll be much happier! Everybody deserves a second chance!

5. Smile - a lot! When you're feeling low - Smile. When somebody hurts you - Smile. when you feel defeated - Smile! Know what??? Its infectious! It can even stop an argument!!!

6. Spend more time with your children! Listen to the little things they tell you. Its fun. I make Aadi stand in front of me, facing me - hugging me - on the scooter when I drop him off to his class. We talk about his day for the journey and we both love those 15 mins!

7. Have a long term goal and break it into smaller ones! Breaking up your long term goal into smaller ones will make it easy to achieve! It will also give you a sense of completion!

 2012 also saw me emerge as a better quilter, I believe. I have tackled stuff that would have scared me. And conquered my fears!

It is also the year of my biggest achievement so far! My portrait Quilt!!!


 I'm really looking forward to 2013!

Why? Its "MY" year! 2013 @ 13 Woodhouse Road!!!

What are my plans for the new year?

I have a simple three-point plan for the new year!

Grow. Reduce. Maintain.

I would like my skills and abilities to grow.
You will see quite a lot of this on the blog!

I want to work on reducing my stress as well as my weight! (I guess weight reduction is on my perpetual to-do list!)

I want to maintain what I have achieved on my home front! I am currently at a "happy" stage as a wife as well as a mother! And I would like to work on maintaining it!

I'm taking the first step towards growing!
I'm hosting a "Self Portrait Quilt Along" right at the beginning of the new year.
Here's the form to fill to sign up.

Fill the form and then join the Facebook group.

I will be posting the general instructions for the quilt on my blog. And I will be emailing specific instructions to all the individual users depending on the method they choose to use and the photos they select.

Find it intimidating? We are going to be a huge support group cheering on each other as we work. There will be lots of help. And I'm working on having prizes in the end too!

Join in!!!

What are your plans for the new year? Start by selecting a photo you want to immortalize and hop on the ride. We'll all help each other to stay afloat!

Here's the schedule.
1. Sign ups and Picture Selection - up to 31st Dec

2. List of supplies - 1st Jan

3. Picture Preparation - 7th Jan to 12th Jan

4. Fabric Selection - 14th Jan to 19th Jan

5. Fusing - 21st Jan to 31st Jan

6. Sewing - 1st Feb - 9th Feb

7. Quilting -11th Feb - 23rd Feb

8. Finish & Show off! - 25th Feb - 28th Feb


Hop on, join the fun!

Cheers!!!

Saturday, May 28, 2011

Bella Parade Quilt Along Post # 5

Bry again!  Well bebe’s this is the last installment in our Bella Parade QAL!  Hope y’all have had fun so far and are ready to finish your mini quilts!  This week we are going to be basting, quilting, and binding our colorful little beauties!

First off iron your top and your backing fabric!  I promise you will be happy you did!  Then create you quilt sandwich – backing right side down, batting, top right side up. 

I am going to pin this little guy.  I know a lot of people are fond of basting spray for small projects, but since I am going to be hand quilting this with embroidery thread I am using pins.  I find when hand quilting that my needle gets caught up in the sticky basting, especially since I use an embroidery needle since I am using perle cotton to quilt and not waxed hand quilting thread. 


To quilt I used a number of different colors of DMC embroidery thread, but only 2 of the 6 strands.  I want the stitches to be a little thick and lay on top of the fabric instead of sinking in.  This requires a bigger needle with a bigger eye, Thread Heaven (which is awesome!!), a marking pin, and a hoop.  Use your marking pin to make your quilting lines.  For the circles I used a roll of tape and traced around it, and a ruler to mark a ¼” away from the HST.  Once your lines are marked start quilting!


Now let’s make and attach the binding!  I used 2 ½ inch strips for my binding from a variety of our Bella solids because scrappy bindings are just so cute and this project is all about using a lot of colors! 
For tips on this check out Jaybird Quilts amazing tutorials!

Personally I love hand binding my projects.  It’s that extra little bit of love.  Plus this project won’t be in danger of multiple washings and lots of hands on use.
Add your label!
AND YOU ARE DONE!!! 


Now would be a great time to do that happy dance from when you finished the top again!
IF YOU WANTED…you could even take this a bit farther and scale this quilt up into approximately a 62” x 62” quilt using the same layout, or even make 9 of these mini quilts and sew them together to make the most colorful throw quilt EVER!

Bella Parade - Tiled Quilt Sketch by A Blond Quilts
Fabric Requirements for either of the THROW SIZE QUILTS:
·         ½ yd of 30 different Moda Bella Solid colors
·          2 ½ yd Bella Solid White
·         70” X 70” inches for batting
·          4 yd backing
·         ½ yd for binding
***You will have LOTS of colorful scraps!  These estimates are on the high side to account for the 2 different types of quilts you can make.***

Measurements for scaled up quilt:  
(Note: I have not made this quilt scaled up and simply multiplied up the measurements so I hope they work!)

Inner Log Cabin
(MAKE 9 – each from 3 different colors.)
(1) 3” x 3” Color A
(2) 3” x 3” Color B
(2) 3” x 9” Color B
(2) 3” x 9” Color C
(2) 3” x 12” Color C
Log Cabin Sashing
(6) 4.5” x 9” white
(3) 4.5” x 30” white
Inner Borders
(2) 6” x 28.5”white
(2) 6” x 37.5” white
Half Square Triangles
(34) 6 7/8” x 6 7/8” Various colors (Use some twice!)
(34) 6 7/8” x 6 7/8” white
(12) 6” x 6” white
Outer Borders
(2) 4.5” x 55.5” white 
(2) 4.5” x 61.5” white
Binding
(3) 2.5” x WOF


I truly hope you have all enjoyed this quilt along with me, and if anyone has any questions, finds an error, etc please email me at bomara [at] gmail [com].  Please add photos of your creations to the Flickr pool!  I would LOVE to see them!